
How to Check Payer Enrollment Requirements and Enroll
Some payers require enrollment before you can exchange electronic transactions with them. Office Ally maintains a list of all payers and transactions that require enrollment.
To determine if enrollment is required and to locate the enrollment instructions, please follow these steps using the accompanying below screenshot for reference. By following these steps, you can easily determine whether a payer requires enrollment for a specific transaction and locate instructions on how to complete the necessary enrollment process to exchange that transaction with that payer.
Determine if the Payer Requires Enrollment
1. Access the Office Ally Payer List
Use one of the following options:
- In Service Center, navigate to the Resources section on the left side of your screen and select Payer List.
- Click on Ally Central (the blue question mark in the bottom-right corner of the screen). Select Resource Library, then click on Office Ally’s Payer List.
- From the Office Ally website, select Resources at the top of the page and select Payer List from the drop-down.
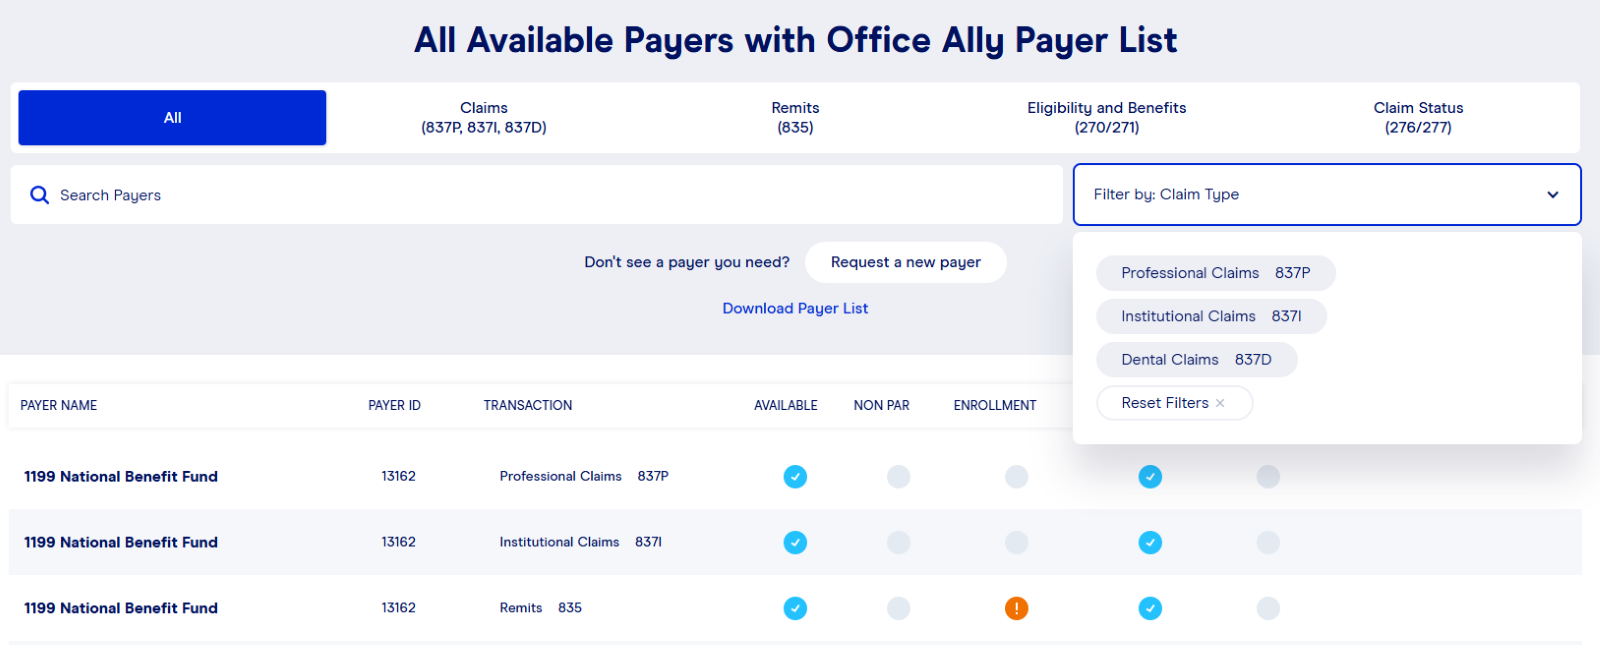
2. Search for the Payer
Use one of the following methods:
- From the Payer List, enter the Payer Name or Payer ID of the payer you’re looking for.
- From the Payer List, narrow your search based on the transaction type you’re interested in. This is done by selecting the transaction group listed across the top banner (Claims, Remits, Eligibility & Benefits, or Claim Status). You can then further refine your search by entering a Payer Name or Payer ID in the search box.
If searching for Claim transactions, you may further narrow your search by selecting Claims from the top banner and then selecting your desired claim type from the drop-down shown to the right of the search box.
Results will display showing all payers that match your search criteria. You can then view the results to determine if your transaction is listed and if that transaction requires enrollment. Transactions requiring enrollment will have a red circle containing an exclamation point (!) in the Enrollment column within the results grid. If enrollment is required, review any notes that are associated with the transaction.
Locate the Enrollment Instructions
1. Find Payer Enrollment Instructions
Use one of the following options:
- In Service Center, navigate to the Resources section on the left side of your screen and select either ERA Enrollment Instructions or EDI Enrollment Instructions.
- Click on Ally Central (the blue question mark in the bottom-right corner of the screen). Select Resource Library, then click on ERA Enrollment Instructions or EDI Enrollment Instructions.
- From the Office Ally website, select Resources at the top of the page and then select either:
- Payer ERA Enrollment Instructions or
- Payer Claims/Eligibility/Claim Status Enrollment Instructions.
2. Identify Your Payer
- Payer ERA Enrollment Instructions are sorted numerically or alphabetically by payer name.
- Payer Claims/Eligibility/Claim Status Enrollment Instructions are categorized by the state associated with the payer. Payers who serve multiple states are listed under All or Multiple States Payer Enrollment Forms.
- Complete the Enrollment Instructions
After locating the enrollment instructions specific to your payer and transaction, carefully review and follow the instructions provided. Failure to follow the enrollment instructions from Office Ally can result in processing delays or rejection of the enrollment at the payer.
Important Notes:
- Claims Enrollment: Review the HOW DO I CHECK STATUS? section carefully to determine whether you can begin submitting claims electronically immediately after being approved or if further communication with Office Ally is required before submitting your first claim electronically to the payer. If you have claims to submit to a payer prior to receiving approval, you may opt to have the claims dropped to paper by Office Ally for delivery to the payer. To ensure proper handling, use payer ID PAPER when submitting the claim(s) and ensure that Paper Claims is enabled on your account prior to submission.
- Remits: Some payers may return the ERA/Remit automatically to the clearinghouse that submitted the claim, eliminating the need for ERA enrollment. For payers that do this, you’ll see this detailed in the Notes column of the Payer List.
- Eligibility & Benefits and Claim Status: If your enrollment has not been approved by the payer prior to submitting either of these transactions, you may see the following response: “Invalid/Missing Provider Identification.”